The physics of the turning shoe and the mathematics of the alignment
Part 2 Deeper Speculation
How to pitch horseshoes with nearly a 100% ringer average . . . in your mind
---Written by Kenny Wolf
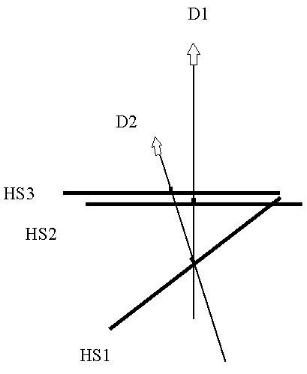
 |
 |
|
|
ALL OTHER LINES THROUGH THE
CENTER POINT WILL EVENLY DIVIDE THE BALANCE OF THE WEIGHT OF THE SHOE ON
EITHER SIDE OF THE LINES
9B If this proposition
does not interest the reader, this section may be skipped and move down
to section 10 and read on. To test if the center point has been found,
stretch a piece of Scotch tape across the center line (wrap it around a
time or two to make it stronger) connecting the blades and mark a black
dot where the center line that divides the horseshoe symmetrically down
the middle crosses this line. Now placing the tip of your index finger
under this dot, see if the shoe remains balanced while holding it up.
WARNING: Don't hold it very high up off the ground over a bare foot
before attempting to hold it up this way unless you are very certain that
you found the center. Again I state "all
other lines drawn through this center point will evenly divide the balance
of the weight of the shoe on either side of the lines."
 But
what about the lines drawn in this next picture to the left--line A going
through the center point and especially line B? How can the horseshoe
still be balanced when there is obviously more weight on one side of the
line than on the other side of the line? With the line A division,
without cutting the shoe up with a hacksaw, it might be argued that the
weight of the portion of the shoe given up from the left half of the shoe
to the right half of the shoe in the upper left of our pictured shoe between
the vertical line Y and line A is the same weight as the portion of the
heavier right heel calk, with the point, given up from the right half to
the left half of line A. But the line B division leaves no such argument.
Line B has the left half of the shoe gaining the metal between line Y and
line B in the upper right of our pictured shoe and giving up empty air
between line Y and line B in the lower left of our pictured shoe.
How can this empty air be the same weight as a piece of metal? Why
wouldn't our shoe be unbalanced with more weight on one side of the shoe
than on the other side? This apparent problem in physics will be
answered later on in this writing in section 20B. Just think about
it for a while. (Hint: a famous Greek geometrician and philosopher
named Archimedes once proclaimed, "Give me a place to stand and with a
lever I will move the whole world." Living in a period from 287 to
212 BC, this man discovered principles of the lever and of specific gravity
which answers what seems to be a paradox of unequal weights on two sides
of a "see-saw" remaining in a state of balance.)
But
what about the lines drawn in this next picture to the left--line A going
through the center point and especially line B? How can the horseshoe
still be balanced when there is obviously more weight on one side of the
line than on the other side of the line? With the line A division,
without cutting the shoe up with a hacksaw, it might be argued that the
weight of the portion of the shoe given up from the left half of the shoe
to the right half of the shoe in the upper left of our pictured shoe between
the vertical line Y and line A is the same weight as the portion of the
heavier right heel calk, with the point, given up from the right half to
the left half of line A. But the line B division leaves no such argument.
Line B has the left half of the shoe gaining the metal between line Y and
line B in the upper right of our pictured shoe and giving up empty air
between line Y and line B in the lower left of our pictured shoe.
How can this empty air be the same weight as a piece of metal? Why
wouldn't our shoe be unbalanced with more weight on one side of the shoe
than on the other side? This apparent problem in physics will be
answered later on in this writing in section 20B. Just think about
it for a while. (Hint: a famous Greek geometrician and philosopher
named Archimedes once proclaimed, "Give me a place to stand and with a
lever I will move the whole world." Living in a period from 287 to
212 BC, this man discovered principles of the lever and of specific gravity
which answers what seems to be a paradox of unequal weights on two sides
of a "see-saw" remaining in a state of balance.)
10 IMPORTANCE
OF KNOWING WHERE THE CENTER OF GRAVITY IS
11
THROWING AN OPEN SHOE AT THE STAKE DOES NOT HAVE TO DEPEND ON LUCK
12
BACK SWINGS MAY VARY
13
STRAIGHT BACK SWING AND FORWARD SWING
14
HOW MUCH TURN ROTATION TO PUT ON A SHOE
14B
EFFECT OF THE STEP ON THE FORWARD MOTION OF THE SHOE
15A
HOW MUCH TURN FOR HOW LONG
15B
WHAT AMOUNT OF INFLUENCE STAYS WITH THE SHOE INTO FLIGHT?
15C
. . . AND THE IMPORTANCE OF THE FOLLOW THROUGH
16
FACTOR OF WHERE SHOE IS GRIPPED
17
SHOE CAN WORK ITSELF OR TURN ITSELF
WHAT IS A WOBBLE IN A SHOE (PART 1)
18A What is a wobble in a shoe and how can it be eliminated?
Some might refer to a wobble shoe as when the horseshoe is released in
such a position that one half of the shoe, open end points are up versus
closed end down (or vice versa) or gripped blade points up versus the loose
blade down (or vice versa) or some blend of these halves of the shoe around
the center of gravity, is higher or lower than the other half. With
this definition of a wobble in the shoe, only a shoe that is thrown perfectly
level with all parts of the shoe perfectly parallel to the ground during
flight would not be considered a wobble shoe. Others would say these
are not wobble shoes, but these are simply shoes thrown with the points
or heel calks up (or down); or the gripped point up (or down). Some
may even believe a true wobble in the horseshoe is caused by throwing a
shoe that has the turn rotation motion applied at a point close to the
center of gravity of the shoe, but not quite in the center. (Read
through this line of thought, before reading the following section 18B,
showing the error of this way of thinking). They would contend that
if that turn rotation center is a half inch from the true center of the
shoe, then the shoe will wobble its turn center toward the true center
and continue wobbling unbalanced until it reaches a balanced spin, if it
can before reaching the landing point. If it was turned around a
center that is an inch or more from the true center, then it may never
reach a balanced state during flight before landing and may land unbalanced.
A balanced thrown shoe can be spotted a mile away. And remember,
no matter what point the rotation turn influence is pivoted around, the
center of the shoe or off center, it is the place at the end of the court
that the center of the shoe is thrown at that will be hit. The off
center wobbling shoe may even hit the stake as a ringer, if the center
of the shoe was thrown at the stake in a straight line, far enough and
if it happened to be open when it got there. But the off center shoe
will not have a pretty flight. It would be their opinion it will
be the shoe that seems to have a lot of wobble. Therefore it would
be their belief that many horseshoe pitchers do have some wobble in their
shoe because they are not turning the shoe around the true center of gravity
of the shoe. Note: I expressed the above, because when I first
started writing this page, I believed all of this about a shoe spinning
around an off center point in the shoe. I corrected my own thinking
in section 18B below.
WHAT IS A WOBBLE IN A SHOE (PART 2)
18B In 15B above, earlier in this writing, I stated that "the
exact rate of turn on the shoe at the very moment of release, which is
the only moment of influence which really influences the shoe". Then
in discussing the different theories in what constitutes a "wobble shoe"
(in 18A above), this principle was ignored. In other words:
No matter where the off-center point is that a pitcher might be applying
turning motion around; (1)the center of the shoe will be the portion of
the shoe that heads straight down the court in the exact direction it was
thrown and, (2) only the last motion "in relation" to the actual center
of the shoe will influence the shoe around that center--even though the
pitcher might have consistently applied a nice smooth turn motion around
an off-center point. Its like saying the shoe knows where its center
is, even if the pitcher does not. So whatever off-center point the
pitcher is trying to revolve around and influence, it is actually the true
center of the shoe that will receive the effective influence on it at the
point of release!
|
The Theory of Shoe Tilt
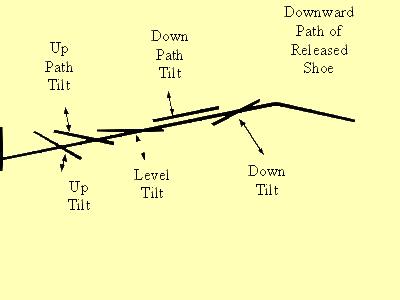
I do not deny that there is a tilt when the shoe is released. I'm just not sure in practice that any pitcher would spin the shoe to maintain a particular "path tilt" angle. In practice, horseshoes seem to tumble with the shoe spinning in the position the shoe was in at the point of release (i.e. both heel calks up, one particular heel calk up and the other down, both heel calks down, etc.). Turning shoes tend to have a predominant amount of horizontal motion in the turn as opposed to vertical motion (or more motion in the angle of the upward path of the shoe) that conforms with gravitational pull versus vertical lift beyond the upward path of the flight of the horseshoe. As discussed elsewhere on this page, too much vertical lift in relation to the upward path of the shoe will cause the shoe to flip or turn over. I originally did not have these sections on shoe tilt highlighted with "yellow" colored background and did not have the introduction above preceding the sections. After receiving an email from someone saying they did not follow exactly what I was trying to say concerning shoe tilt, I thought some more about it and realized that much of what I was thinking and writing about on shoe tilt was not that practical, but nonetheless interesting from a theoretical standpoint. Again, I emphasize that I'm not trying to sound like a know-it-all, I'm just expressing thoughts that are going on in my mind when I think on these things. I think the physics of horseshoe pitching is fascinating and very interesting to think about. SHOE TILT AND SHOE LIFT (THE UPWARD PATH) 
All shoes have at least a little
lift or drop in the shoe (in relation to the upward path of the thrown
horseshoe) except for one particular delivered shoe. The exception
is the shoe that is completely in the delivery plane at the bottom of the
swing already in the correct Up Path Tilt position. The full upswing
of the shoe would have to keep the shoe on this delivery path plane with
only turn rotation motion placed on the center of the shoe and no lift
(in relation to the delivery path) needed on the shoe. This is what
Ive referred to as a Up Path Tilt shoe. If the pitcher can hold
the shoe at the bottom of the swing and apply only revolution turn motion
around the center of gravity of the shoe that is in the delivery plane
only, the shoe will travel only in the delivery plane without any lift,
thus maintaining its Up Path Tilt. Even a Level Tilt shoe will need
a little lift in back in order to maintain its level position during flight
along a delivery path that is slanted up and out. This is where all
of this gets a little confusing. We
are discussing Tilt and Lift in relation to the path of the released shoe,
not to ground level. Also,
we are discussing the path of the released shoe as a line when we are referring
to the center of the shoe traveling on the line and we refer to the path
of the released shoe as a plane when we are referring to the whole shoe
measuring a maximum of 7-1/4 inches wide and 7-5/8 inches long. (Note:
If a shoe is thrown with no turn rotation, but only lift, then it is a
flip shoe and had better be open upon release if it is to have a chance
of going on as a ringer.) To help visualize the horizontal and vertical
plane that heads straight for the stake at release point of the shoe, picture
a little 8 inches wide miniature highway going from the release point of
the hand heading up and out from the pitcher, coming to a peak high point
where the shoe then begins it's descent down towards the stake. This
little 8 inches horizontal highway would end about 4 inches up the stake
from the bottom of the pit and the middle of the stake would be dead center
in the middle of this little highway.
The vertical delivery plane referred to in this writing would be a little
8 inches high wall that would intersect this horizontal highway right down
the middle and would end with the bottom of the wall in the pit and the
top of the wall 8 inches up the stake. The delivery path "line" to
the stake is where these two planes--the horizontal highway and the vertical
wall--intersect. Most horseshoe pitchers who desire to throw an Up
Path Tilt shoe will not be able to have the shoe at the bottom of the forward
swing beside the leg in the exact horizontal highway that leads to the
stake; therefore, they will have to apply some lift to get the shoe in
the Up Path Tilt position at the point of release. But then the lift
in the shoe will cause it to become an Up Tilt shoe before it reaches the
high peak of it's flight. Therefore, if an Up Path Tilt shoe is desired
at the high peak of it's flight, the proper lift will need to be applied
and something closer to a Level Tilt, Down Path Tilt or a Down Tilt will
have to be released with the lift on it to make it an Up Path Tilt shoe
sometime during it's flight. In 18E section below, I explain the
wrist motion I use to try to counter or reduce the lift influence on my
shoe I want at the peak of it's flight. Too much lift influence on
the shoe and the pitcher will be looking at a vertical leaning shoe at
some point in it's flight. This shoe is discussed in section 19 below. SHOE TILT AND SHOE LIFT (THE DOWNWARD
PATH) |
A VERTICAL SHOE
19 All the thrown shoes talked about so far are shoes that are
relatively horizontal spinning shoes. One side of the shoe may be
a little higher than the other side while spinning, but the shoes center
of gravity never has any metal of the shoe close to the top of it as it
spins for the stake. A shoe I think is often mistaken for a wobble
shoe because of its peculiar appearance while in flight would be a shoe
thrown that is closer to spinning vertically than it is to spinning horizontally.
A perfectly vertical spinning shoe could be thrown by greeting the stake
with the shoe in a perfect vertical position. In other words, the
gripped and loose blade of the shoe would line up exactly up and down with
the stake. The shoe would maintain this vertical position all the
way back in the back swing and all the way forward in the forward swing
and the turn rotation motion would be easily applied around the center
of gravity of the shoe, because that center of gravity would be always
running along the line to the stake along with both blades of the shoe.
The problem is that a perfectly thrown pure vertical shoe would hit the
stake by both blades of the shoe on the open end points and could not go
on. But it would be a heck of a good alignment throw for practice.
Note: Since the stake at the other end of the court is vertical,
then it would be advisable to throw a shoe that spins closer to a horizontal
than to a vertical flight. Remember, a shoe arriving at the stake
in a perfectly horizontal position has 3 and 1/2 inches open between the
points to go on the stake; whereas a shoe that is coming in leaning toward
vertical cuts that distance to half that or less than half that.
SOMETHING TO THINK ABOUT
20A A shoe that is released from the hand that is pointing closer
to 6 Oclock or 12 Oclock (up or down) than it is to 3 Oclock or 9 Oclock
(left or right), as if you were throwing at a face of a clock would be
a vertical leaning shoe as opposed to the normal horizontal leaning
shoe. Put another way, a perfectly thrown horizontal shoe will be
perfectly level with zero degrees tilt to the left or right when released.
A vertical leaning shoe will be tilting up or down more than 45 degrees.
The perfectly thrown vertical shoe will be spinning at 90 degrees from
the level horizontal position. Any shoe over 45 degrees during flight
will be a vertically leaning shoe. A shoe with a vertical lean in
flight will appear to be very different looking in flight until it lands.
Since most of us are used to watching shoes nearer to zero degrees horizontal,
the appearance of a vertical leaning shoe will look different. Here
is a test question: Is it possible to throw a ¼ turn with
a full flip (thrown clockwise or counter clockwise depending on whether
the heel calks are pointing to the left or right upon release)? And
if so, what would the shoe look like half way down the court (you may need
the assistance of a paper clip bent into a horseshoe shape, with the little
hooks created with pliers, to work this out in front of your own eyes and
be sure to keep the center of gravity of the shoe in mind while following
its path). Also, draw a straight line on a piece of paper and hold
your little horseshoe with the center always over this line as you move
it down the line and watch your little horseshoe turn. Try this with
a clockwise turn and then with a counter-clockwise turn. It doesnt
matter if you are right handed or left handed to work it out! (Here
is a hint to the answer of how the shoe will look in the air: The
shoe will have completed half the ¼ turn or 1/8 of a turn and the
shoe will have completed half of the flip.) This might be a nice
exercise for the pitcher who currently flips the shoe, but wants to learn
to convert to a turn shoe. The pitcher will still be flipping the
shoe one full flip, but also learning to turn the shoe ¼ in order
to be open on the stake.
GIVE ME A PLACE TO STAND AND
WITH A LEVER I WILL MOVE THE WHOLE WORLD--ARCHIMEDES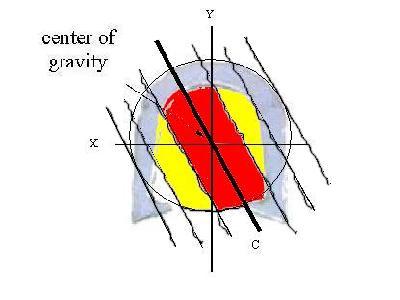
20B If this proposition
does not interest the reader, this section may be skipped and move down
to section 21 and read on. The problem or quandary we posed in 9B
was how a shoe can remain in a state of balance when a line through the
center point dividing the shoe into two balanced halves may be dividing
the shoe into two halves of unequal weight. The picture to the right
shows one such division. Line C drawn through the center of gravity
of the shoe puts more weight onto the right half of the shoe than on the
left half (reread 9B above again for more depth into this question).
But what Archimedes showed us over 2000 years ago is that where that weight
is placed on each side in relation to the center or the fulcrum is also
a factor. Remember as a kid getting on a see-saw with some kid who
weighed more or less than you. The two of you could get the see-saw
perfectly balanced by the heavier one of the two sides moving closer to
the center point or fulcrum. In the shoe pictured to the right with
line C dividing it through the center of gravity, even though the right
side has more weight, much of the weight on the right side is in the red
zone very close to the center line (two portions of metal including the
bulk of the heaviest portion--the heel calk), with some more of it in the
yellow zone (two more slices of metal). Only the corner edge of the
weight of the right upper part of the shoe is outside these two distance
zones I've created here. Note that even this portion is within the
circle drawn around the center of the shoe and within the outside line
which is parallel to center line C. On the left half of the shoe,
even though less weight is on this half, only a little of its weight is
in the red zone, a little more is in the yellow zone, and the rest of its
weight (including the heaviest part of the shoe in the heel calk) farther
beyond the yellow zone and beyond the circle around the center of gravity
and much of it outside of the line that is parallel to line C that runs
through the center of the shoe. To make a long story short (its probably
too late for me to do that now!) the side with more weight has enough of
the weight closer to the center of the "see-saw" to keep the two sides
in balance. A shoe thrown that is spinning perfectly around the center
of gravity of the shoe would be a perfectly balanced shoe at every stage
of it's flight--not just when the Y axis or the X axis is pointing at the
stake.
WHEN A TURN SHOE FLIPS
21 Remember that time or two (or three or four, etc.) that you
threw your horseshoe and it went on the stake, but it landed upside down
from the way you threw it? (You threw it with the toe calk at the
closed end down, but it landed with the toe calk up). You may have
noticed it happen while in the air or you may have been surprised, when
you walked down and leaned over to pick it up (Ive done it and I know
Ive done it when I see it in flight). This can only happen if the
pitcher puts influence on the spin of the shoe that allows some metal on
the shoe to pass over or under the center of gravity of the shoe (that
is the definition of throwing a flip shoethink about it). Now visualize
or use your little paper clip horseshoe to view what would take place on
a 1 cw or ccw full turn - with one full flip shoe. Can you create
the position of the shoe at half court? Hint: If you do it
right, the full flip shoe with no turns will be in a perfect horizontal
position with both points or the open end of the shoe pointing straight
at the pitcher after completing half a flip--assuming it was released with
the points or open end of the shoe pointing at the opposite stake at the
release of the shoe. If I did it right, the 1 cw or ccw full turn
with one full flip shoe at half court will be in a perfect vertical position
with both points pointing at the pitcher. Also, a line drawn straight
up the stake will go right through the entire horseshoe. Can a real
horseshoe even be thrown this way with enough turn rotation motion along
with flip influence to get the shoe to complete this flight? Just
something to think about. This might also be a good shoe for the
flip shoe pitcher to experiment with if wanting to convert over to a turn
shoe. Once they have learned to do this, they can simply eliminate
the flip influence on the shoe and add another ¼ turn of rotation
or take off ¼ turn of rotation and they are throwing a 1-1/4 turn
shoe or a ¾ turn shoe.
PRACTICING HORSESHOES IN THE HOME
22 During the winter months, a pitcher can practice the greeting,
back swing, and forward swing of the horseshoe, while applying the turn
rotation motion to see if the center of the gravity of the shoe is staying
on the imaginary line to the stake, while being confined indoors.
By being in a long room, preferably a hallway, where the pitcher can safely
swing the shoe without fear of hitting anyone around who might pop up.
A closed door behind is a good idea, with all the doors immediately around
your swinging area also closed, so no one walks out and gets clobbered.
(I would not even suggest anyone do this if they have small children in
the home or have any pets who might walk into the back swing and receive
a concussion to the head or some other body part). Take a rope or
thick wire and stretch it out straight down the hallway. Attach it
to the end somehow. This line represents the straight line to the
opposite stake the pitcher is swinging at to hit the ringer. A more
elaborate set-up can be constructed, if space allows, where cardboard or
wood or some material measuring 18 inches across, so the position of the
stake that is beside the pitcher can be marked with half a big black 1
dot. The material should then be 3 feet long running down the hall
representing the other dimension of the fourth of the pit beside the pitcher
and the 3 feet leading to the foul line (use the length measurement of
the pits you normally pitch at in the better weather). Now take the
end of the rope that is not attached at the pitching end and stretch it
across the area where the swing is going to take place. If you have
a mathematician in the house, they can calculate the exact angle the rope
or wire needs to go if it were actually stretched 40 feet from the stake
dot at the pitchers end and where the stake would be at the other end.
Example: Once it is determined how many inches the rope will lay
from the imaginary stake at the pitchers end toward the pitcher, say exactly
18 inches towards the edge of the pit plus 2 into your walkway, then have
the mathematician figure the angle if the rope went 40 feet or 480 inches
(40 X 12) 480 inches divided by 20 inches equals 24 inches.
In other words for every 2 feet straight down your hall (not straight down
the rope), your rope would be one inch away from your straight line down
the hall. (This method of marking the pitching line in relation to
the line between the two stakes does not require that you have a mathematician
figure the angle). If you have a hall that is 40 feet or 480 inches,
the rope would be 20 inches away from your straight line down your hall,
which would attach it to the place where the stake would be anyway.
(Heck, if you have a hall that is 40 feet, just cut the floor out at both
ends and put in real pits, tear out the ceiling over the area and pitch
real horseshoes in your hallway, arching into the attic, all winter long).
ANGLE OF THE LINE TO THE STAKE
23 If all of this seems confusing, remember, I said if you had
a mathematician in the home, have them read this and make it their project
to help you out on the angle of the rope down the hall. If you dont
have one, then just make sure if your hallway is only say 10 feet, then
the rope is not more than a fourth of the way (5 inches in) toward what
would be the straight line between your two imaginary stakes. 15
feet down the hall would be just short of halfway toward the imaginary
line between the stakes (not to be confused with the imaginary line between
the pitchers swing and the stake being swung at, which is marked with
a stretched rope or heavy wire). Now that the pitcher has the indoor
practice court constructed, it is time to try it out. (Note:
If you dont have much unoccupied space in your home to carry out this
practice, then go into a room, close the door and practice watching your
back swing and forward swing in a full length mirror mounted on the wall
in front of you. Be sure to give yourself plenty of room behind and
plenty of room in front towards the mirror, so your 2 and ½ pounds
horseshoe does not do any damage to anything.) You will be able to
observe if you can swing a horseshoe straight or if you are going to have
to rely on luck to throw the shoe straight at the stake when summer rolls
around.
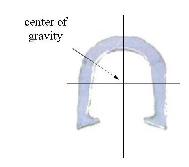
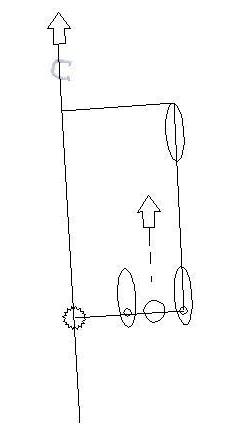
MARKING YOUR SHOES CENTER OF GRAVITY
24 To really make all of this clear and visible, the pitcher
should take one of the favorite horseshoes pitched outside in the fair
weather and find the center of gravity of the horseshoe, using the method
described earlier in this writing. Now mark a black dot in this center
. . . (wait, there is a problem with this, the center of the shoe is not
on the metal of the shoe, but rather in between the blades somewhere).
So, take something like a rubber band, or even better a strip of clear
Scotch tape, and stretch it along this line between the blades that designates
the center line dividing the weight of the left half of the shoe with the
right half of the shoe. Now, cut out a half inch diameter black dot
and tape it in the center of this rubber band or use a black marker to
make this half inch diameter black dot on the clear tape (hint, it should
be exactly halfway on the rubber band or tape if the pitchers favorite
shoes are balanced).
PITCHING HORSESHOES IN SLOW MOTION
25 This is where all the fun begins and the pitcher finds out
in slow motion why the ringers just werent coming for some mysterious
reason this past summer. First, the pitcher should stand where normally
standing outside in relation to the stake and pit at the pitchers end
of the stretched rope. The rope should have been stretched across
the path where the pitcher swings forward before delivering the shoe to
the other end. (note: do not release the horseshoe during these
slow practice swings in the house unless the pitcher had 40 feet of hallway
and all the necessary work was completed to put in indoor pits).
Take a few slow practice swings with the turn used last during the summer
months. Look down at the line and note that the center of gravity
of the shoe rarely follows the rope during the application of the turn
motion on the horseshoe. That is why the pitcher was not throwing
consistently this past summer when pitching outside. Unless consciously
aware of the importance of creating all the turn rotation motion of the
horseshoe around the center of gravity of the shoe, most pitchers are just
getting lucky sometimes when they are pitching outdoors and swinging their
hand straight along this line to the stake or rotating their shoe around
the pivot point of the center of the shoe. Keep practicing this delivery
in slow motion over and over. Be sure to hang onto the shoe while
indoors. And dont be too anxious to speed up the swing to normal
speed. If this swing and turn rotation on the horseshoe cannot be
mastered in slow motion, then you might as well get out the chessboard,
because your horseshoe pitching game is not going to improve. Just
kidding, you may continue to throw horseshoes outside as long as you are
content with luck. At least, you will understand from these indoor
practices, why the shoe is not heading for the other stake and turning
properly around the center of gravity of the shoe. (Later on in this
writing, an easier way will be explained for how to lay this rope or wire
toward where the stake would be if you had 40 feet of space in your home.
The method has to do with the amount of distance in feet for every inch
the rope or wire goes towards the true stake to stake straight line.)
Also, the pitcher may also wish to create that line on the wall that shows
the point where the center of gravity of shoe is when at the side and where
it is at the end of the forward swing where it would be released.
Use masking tape rather than marking the wall up with a black marker.
PITCHING HORSESHOES IN THE SNOW
26 Once this slow motion forward swing is mastered. . . the pitcher
can observe that the center of the shoe is going down the center of the
rope toward the other stake and all the time the pitcher is applying the
turn rotation motion on the shoe, the center of the shoe is still following
the path of the rope, then the pitcher might feel confident enough to start
speeding up the swing, until at last the pitcher can confidently swing
at full speed and execute the forward swing and turning of the shoe right
on top of the rope. At this point, even in the winter, the pitcher
will be tempted to go out to the outdoor courts, covered with six to eight
inches of snow and let a couple rip. Warning: the first few
shoes thrown will be easy to find, because there will be clear imprints
in the snow where the shoes hit. But after a while, the pitcher will
not know which imprints are new ones, indicating where the latest two pitches
landed. Of course, if everything in this article was mastered by
the pitcher, there will only be imprints around the stake. Additional
Warning: the low temperature outdoors will likely alter your pitching
ability. So it would still be advisable to wait for spring.
PITCHING HORSESHOES WITH A TRAINING ROPE
27 When spring rolls around, the pitcher is going to want to
take the indoor rope along when starting to pitch again on the outdoor
courts. The pitcher will think of the rope as training wheels.
Tying the rope to the opposite stake and stretching toward the other stake
and running on the ground along the pitchers full swing. The pitcher
might even employ a fellow pitcher to stand behind the pitcher and tighten
up the rope when the swing is executed in slow motion. If the two
of them get real creative, they may even design an adjustable stand up
post that can be placed somewhere near the middle of the court that goes
up as high as eight feet, so that the rope can be stretched up over the
top of the post. If it has a little slack as it drops in to where
the pitcher is swinging and then tied down behind the pitcher, then we
have a real nice set of training wheels indeed. If the pitcher puts
the correct turn on the shoe, throws it with the correct force at the right
distance and stays over the imaginary line (actually a physical training
rope), then the pitcher may begin pitching nearly 100% ringers before the
following summer is over. Oh well, one can dream cant one?
Later on, I guess we should talk about knowing all there is about the physics
and mathematics of pitching ringers, but not being able to avoid the human
trait of choking. Choking brings the ringer percentage down, down,
down.
THE MATHEMATICS OF THE ALIGNMENT AND WHERE TO STAND TO TAKE ADVANTAGE
28 If you got this far in the reading, you are in for the biggest
inside secret of horseshoe pitching. I will now explain the mathematics
of the alignment. I once read where a pitcher asked the question
if a pitcher could legally pitch the horseshoe while standing in the pit?
The pitchers thinking was surely that if the back swing and the forward
swing could simply be down the straight line between the two stakes (I
believe a 15 inches stake sticking up out of the ground would interfere
with the swinging horseshoe if a short horseshoe pitcher pitched down the
straight line between the two stakes) then the alignment of the pitch would
be so much easier to control. Well, other than that obstacle of the
15 inches stake and the sticky watered down clay that the pitcher would
be standing in, it would seem like getting the proper alignment would be
easier if the pitcher could stand in the pit. With the application
of mathematics, the alignment of the swing of the horseshoe is almost as
simple to figure out as throwing from stake to stake. The center
of most horseshoe stakes is 18 inches away from the edge of the cement
walkway that the pitcher pitches on. Simply add on 2 more inches
and the pitcher has a point that is exactly 20 inches from the center of
the stake. Why 20 inches? That is where the mathematics comes
into the calculation on where to stand and where to greet the stake and
where to execute the back swing and where to execute the all-important
forward swing. From the center of one stake to the other is exactly
40 feet if pitching on a regulation court. With 12 inches in each
foot, the stakes are exactly 480 inches apart. Why do we convert
feet to inches? We are coming to that.

USING A NICE 3 FEET STEP TO THE FOUL LINE FROM THE SPOT
30A While standing in the spot to make all our calculations work
out with one inch gained on the stake lines for every 2 feet the shoe travels
during the forward swing past our leg and up to our forward foot after
taking our near 3 feet step, the shoe should now be 1-1/2 inches closer
to the stake line (2 feet gains 1 inch, so 3 feet gains 1-1/2 inch).
What does this all mean? It simply means this. A scope on a
rifle allows the shooter to put the cross hairs at one end of the scope
with the eyeball at the other end of the scope centered on the cross hairs,
right on the target before pulling the trigger, giving the shooter a much
better chance of hitting the target than if the shooter just raised up
the rifle and fired in the vicinity of the target. The horseshoe
pitcher now has a scope, so to speak. While facing straight down
the court, from the bottom of the pitchers forward swing, the pitchers
shoe must be 1 and ½ inches closer to the stake line when it passes
the point that is about 3 feet from where the back leg is standing, or
not coincidentally at the foul line. Remember the center of the shoe
started out at the bottom of the forward swing by the leg exactly over
the spot that was 20 inches from the center of the stake. So after
traveling 3 feet, it should be 1-1/2 inches closer to the stake line or
½ inch from the edge of the pit. Who says horseshoe pitching
is not a game of inches.
THREE DIFFERENT WAYS TO ORIENT THE BODY WITH THE STEP AND SWING
30B Now I began the last paragraph stating that the pitcher is
facing straight down the court. This would require that the forward
swing begin going out from the body by 1-1/2 inches by the time it has
traveled 3 feet in the pitchers hand from the leg up. In order to
keep a straight swing, the pitcher must slightly turn toward the stake
so that a straight swing passes along this alignment path. Both of
these methods of delivery require that the stepping foot step straight
ahead. Another method some pitchers use (probably without thinking
this deeply into it) is to look straight ahead while stepping slightly
across their stationed foot by about 1-1/2 inches toward the stake and
slightly twisting their body to make up the 1-1/2 inches. Since right
handed pitchers generally miss to the right and left handed pitchers generally
miss to the left, it would seem that most pitchers overestimate this minor
angle 1-1/2 inches adjustment in their swing toward the stake. It
looks like so much when they look all the way down the court and see the
big 20 inches difference, but taking care of only 1-1/2 inches in 3 feet
at their end (using their 3 feet scope swing) will take care of the 20
inches at the other end! (Remember, for consistent illustration purposes
only, I have used 20 inches from the stake for the swing line beside the
leg. If the pitcher stands at the edge of the pit with the side of
the shoe and the hand hanging down with the center of the shoe over a point
in the pit that is 10 inches from the center of stake, then 10 inches will
have to be made up in 40 feet of flight or 1 inch per 4 feet. This
would be the same for a 15 inches point in the pit (or 3 inches toward
the stake from the edge of the pit, in which case the rate to make up would
be 15 inches in 40 feet of distance or 1 inch per 2 and 2/3 feet.)
SEEING IS BELIEVING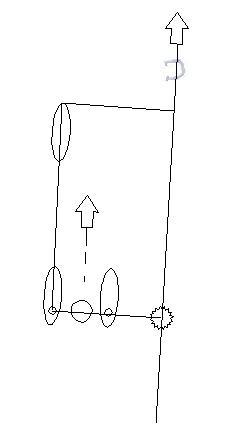
30C The illustration to the right shows an aerial view of where
the right-handed pitcher might stand and step if an attempt is made to
swing the the horseshoe square with the shoulders and aligned perfectly
with the stake. (Scroll on down to see the illustration for
the left-handed pitcher). In order to use measurements in our discussion,
let's say the pitcher swings the shoe approximately 6 inches away from
the center of the right foot and approximately 12 inches away from the
center of the left foot. This would make the center of the left foot
exactly 6 inches away from the center of the right foot. (To visualize
this possibility, simply stand with a 12 inches ruler placed on top of
your feet with the end at the center of the left foot and the half way
point of the ruler at the center of the right foot, and note that the other
end of the ruler is approximately where a pitcher might swing the shoe).
We are not saying here that these are the ideal distances for the feet
to be apart and the distance from the leg to swing the shoe. WHATEVER
WORKS FOR EACH PITCHER SHOULD BE USED FOR THAT PITCHER! We are just
setting up some measurements to follow our idea on the step toward the
other stake. Now looking at the illustration, the pitching arm needs
to swing straight at the opposite stake, if there is to be any chance for
the horseshoe to go on as a ringer. But the illustration shows the
importance of the step forward with the stepping foot. If the arm
swings straight toward the stake, the foot steps straight forward from
its beginning position (with the line between the two feet representing
the "square" shoulder), thus ending the step the same distance from the
plane of the swinging horseshoe as it was from it when the horseshoe was
beside the leg (tilting the head to the left or right during the forward
step is a bad habit for pitchers who do not compensate for this movement
with the rest of their delivery). The head should also go straight
forward in order to keep the shoulder from breaking out of the perpendicular
relationship with the stepping foot and the swinging horseshoe. In
this system of delivery, the slightest turning of the shoulder will begin
to affect the straight aligned swing toward the stake. Again, to
be emphasized here, this is the illustration of a form or system of delivery
that is "square with the world". The truth is that many or maybe
even most horseshoe pitchers violate some part of this illustration and
then compensate somewhere in their delivery for the violation. If
that is the way they pitch, it actually would not be totally fair to call
it a violation as such, but in comparison to this "square" system of delivery,
it is.
 Some
may cross over with the stepping foot in front of the stable foot, but
then compensate their swing to make up for this movement. I suspect,
most good pitchers will tell the novice to be sure and place the bulk of
the pitcher's body weight on the stable foot throughout the delivery until
that moment when the weight shifts to the stepping foot. This allows
the balance to be maintained throughout the entire delivery process.
A smooth step in the timing is what helps keep the horseshoe on its original
course. A sudden drop onto the stepping foot is very likely to jar
the shoe from its straight path to the stake and throw the shoe to the
left or right of the stake. Even with the "square" delivery, there
is room for variation amongst pitchers. Some will tell you it is
easier for them to stand straight throughout the step forward. Others
will say it is more natural to bend forward and lean into your step.
Each pitcher should experiment with what is most comfortable with them.
Other variations are that some pitchers will use more of a "set" delivery
method, by holding the shoe up close to their face and then swing back
and forward and then let it fly. Others will use what Dan Kuchcinski
and others refer to as the "rhythm" delivery. That is, they might
begin by holding the shoe out in front of them, but then they swing the
shoe back and forth (sometimes the other arm swings right along with the
pitching arm) until it feels right to let it go; or they may have a delivery
where they swing back and forth a given number of times (say 3) and then
delivery it. Again, the best advice is to not be afraid to experiment
with each method to see which one is the most comfortable with each pitcher.
Studying the illustration above (or to the left for lefties), one can see
that any pitcher who tells you to point your feet directly at the stake
at the opposite end, if that is precisely what they do; must swing their
arm not quite exactly square with their shoulder, else they would throw
6 inches or so to the right of the stake (for a right-hander) or 6 inches
or so to the left of the stake (for a left-hander). (Or whatever
measurement the swinging shoe is from the center of the planted foot).
If one is actually trying to use the "square" delivery, where the shoulders
always maintain that square with the swinging arm, then the planted foot
would actually point about 6 inches or so to the left of the stake (if
a string was run down the court from the middle of the planted foot).
Again, it must be emphasized here that whatever works should be used for
each pitcher, but in order to discuss one such method, parameters must
be set and adhered to in order to stay within that system! I have
seen videos of world champion pitchers who lean slightly over toward the
swinging arm and it sure works for them. The key is that whatever
each great pitcher does, they consistently do it nearly 80% to 85% of the
time. Awareness of what one is actually doing is the first step to
developing one's own timing and rhythm. And it is this same awareness
that allows good pitchers to make immediate corrections when they miss
the stake. The discussion here was intended for explaining one such
delivery system to show what is being worked out by the great pitchers.
The rest of us just step up there and swing one way and step another way
and release at different points and do all of this at various speeds and
expect the same results pitch after pitch. When we do this "consistently",
we do get the same results, we miss repeatedly. IT JUST DOESN'T WORK
THAT WAY IF ONE IS TO BECOME A GOOD CONSISTENT PITCHER WHO HITS A HIGH
PERCENTAGE OF RINGERS! I've seen world champion pitchers look down
first at their feet in relation to the pit beside them to assure themselves
that they are starting everything correctly before they ever look down
at the opposite peg. I get the impression that they could probably
put on a blindfold at this point and out pitch the rest of us. Because
their "form" takes over once they are positioned right in the beginning.
Form merely being that thing which they are able to do over and over again
without breaking out of it.
Some
may cross over with the stepping foot in front of the stable foot, but
then compensate their swing to make up for this movement. I suspect,
most good pitchers will tell the novice to be sure and place the bulk of
the pitcher's body weight on the stable foot throughout the delivery until
that moment when the weight shifts to the stepping foot. This allows
the balance to be maintained throughout the entire delivery process.
A smooth step in the timing is what helps keep the horseshoe on its original
course. A sudden drop onto the stepping foot is very likely to jar
the shoe from its straight path to the stake and throw the shoe to the
left or right of the stake. Even with the "square" delivery, there
is room for variation amongst pitchers. Some will tell you it is
easier for them to stand straight throughout the step forward. Others
will say it is more natural to bend forward and lean into your step.
Each pitcher should experiment with what is most comfortable with them.
Other variations are that some pitchers will use more of a "set" delivery
method, by holding the shoe up close to their face and then swing back
and forward and then let it fly. Others will use what Dan Kuchcinski
and others refer to as the "rhythm" delivery. That is, they might
begin by holding the shoe out in front of them, but then they swing the
shoe back and forth (sometimes the other arm swings right along with the
pitching arm) until it feels right to let it go; or they may have a delivery
where they swing back and forth a given number of times (say 3) and then
delivery it. Again, the best advice is to not be afraid to experiment
with each method to see which one is the most comfortable with each pitcher.
Studying the illustration above (or to the left for lefties), one can see
that any pitcher who tells you to point your feet directly at the stake
at the opposite end, if that is precisely what they do; must swing their
arm not quite exactly square with their shoulder, else they would throw
6 inches or so to the right of the stake (for a right-hander) or 6 inches
or so to the left of the stake (for a left-hander). (Or whatever
measurement the swinging shoe is from the center of the planted foot).
If one is actually trying to use the "square" delivery, where the shoulders
always maintain that square with the swinging arm, then the planted foot
would actually point about 6 inches or so to the left of the stake (if
a string was run down the court from the middle of the planted foot).
Again, it must be emphasized here that whatever works should be used for
each pitcher, but in order to discuss one such method, parameters must
be set and adhered to in order to stay within that system! I have
seen videos of world champion pitchers who lean slightly over toward the
swinging arm and it sure works for them. The key is that whatever
each great pitcher does, they consistently do it nearly 80% to 85% of the
time. Awareness of what one is actually doing is the first step to
developing one's own timing and rhythm. And it is this same awareness
that allows good pitchers to make immediate corrections when they miss
the stake. The discussion here was intended for explaining one such
delivery system to show what is being worked out by the great pitchers.
The rest of us just step up there and swing one way and step another way
and release at different points and do all of this at various speeds and
expect the same results pitch after pitch. When we do this "consistently",
we do get the same results, we miss repeatedly. IT JUST DOESN'T WORK
THAT WAY IF ONE IS TO BECOME A GOOD CONSISTENT PITCHER WHO HITS A HIGH
PERCENTAGE OF RINGERS! I've seen world champion pitchers look down
first at their feet in relation to the pit beside them to assure themselves
that they are starting everything correctly before they ever look down
at the opposite peg. I get the impression that they could probably
put on a blindfold at this point and out pitch the rest of us. Because
their "form" takes over once they are positioned right in the beginning.
Form merely being that thing which they are able to do over and over again
without breaking out of it.
30D
FINAL ADVICE WITH ONE'S CHOSEN FORM
THEORY IN PRACTICE WITH THE TRAINING ROPE
31 If a pitcher is serious to see this theory in practice (the
discussion in 30B above, before the tangent discussion of 30C was inserted),
just get out the old training rope and run it from the opposite stake to
within ½ inch of the edge of the pit at the foul line and on through
the back swing line and practice swinging down the alignment line until
this 1-1/2 inches in a 3 feet swing can be down pretty consistently without
the training rope. The main point of the training rope is to help
the pitcher visualize what needs to take place on the swing to keep the
center of the shoe on the alignment, thus allowing the muscles and the
mind to "remember" this minor adjustment in orientation to the pit and
stake and foul line by the pitcher.
THE MATHEMATICS OF THE CROSSFIRE HORSESHOE PITCHER
32 The right handed pitcher who pitches from the right side of
the stake and the left handed pitcher who pitches from the left side of
the stake is called a crossfire pitcher. The crossfire pitcher is
pitching an additional 20 more inches away from the side of the stake at
the pitching end which calculates out to be 40 feet and 1-5/8 inches from
the stake being pitched at; or only 1-1/4 inches farther than the other
pitchers have to pitch. The only disadvantage I can see with the
crossfire pitchers is they may have to eat an extra bowl of cereal in the
morning of a big tournament to get up the extra energy to pitch the additional
1-1/4 inches, but other than that, there is no other major disadvantage
as far as alignment goes. But the major difference is that the cross
fire pitcher has 40 inches to close in on the stake to stake line as opposed
to 20 inches make-up on the other side. 40 inches at a distance of
approximately 40 feet (or 41 feet and 5/8 of an inch) means the cross fire
pitcher will cross about 3 inches toward the stake at a rate of make-up
of 1 inch per 1 foot. (In #14 above, we mention the fact that a shoe
thrown a little higher with more arch will travel a little farther distance
in the air than our illustrations of using a straight line on the ground--but
we would need more information and calculus to start splitting inches here,
so we continue to illustrate these principles using 40 feet, 20 inches
and 40 inches.) (note: With the design of the open end of the
shoe being 3-1/2 inches, calculating to hit dead center on a 1 inch stake
gives the pitcher 1-1/4 inches on either side to hit the opening of the
shoe onto the stake, plus the width of a shoe can be 7-1/4 inches, so less
the 1 inch stake gives 3-1/8 inches on either side to still have a chance
of going on depending on the angle of the spin and the slant of the points
and hooks). With the cross fire pitcher, the shoe can be released
more in front of the body of the pitcher if the pitcher is facing straight
ahead during the delivery of the shoe (see #30 above for different methods
of facing during the delivery of the shoe and apply to the cross fire pitcher--straight
facing down court with 3 inches cross toward the body, straight facing
the stake with a straight swing, or straight facing down court with a twist
of the body and a straight swing). More could be said here, like
some cross fire pitchers who face straight down the court and cross their
body to make up the 3 inches per 3 feet may have a back swing that also
swings out away from their body approximately 3 inches. Whereas some
pitchers pitching on the "normal" side using the facing straight ahead
method of standing would swing approximately 1-1/2 inches behind them towards
their body, so that they swing their arm straight ahead and slightly towards
the stake to make up the 1-1/2 inches per 3 feet towards the stake to stake
line. If standing in the right spot by facing the distant stake,
either the normal or cross fire pitcher can use a straight back swing and
a straight forward swing and not worry about gaining on the stake to stake
line, then the correctly orientated stand will take care of all of this.
This discussion is about showing that the 20 inches, 15 inches, 10 inches
or whatever amount of inches off the stake to stake line is taken care
of with only an inch or two during the swing in relation to the stake to
stake line. Now we are beginning to understand why so many different
pitchers with all the various turns, stands, swings, methods of pitching,
etc. make the game of horseshoe pitching so colorful.
33 OTHER
PRINCIPLES TO BE DISCUSSED
CONCLUSION
READERS
RESPONSES AND COMMENTS
10 IMPORTANCE
OF KNOWING WHERE THE CENTER OF GRAVITY IS
11
THROWING AN OPEN SHOE AT THE STAKE DOES NOT HAVE TO DEPEND ON LUCK
12
BACK SWINGS MAY VARY
13
STRAIGHT BACK SWING AND FORWARD SWING
14
HOW MUCH TURN ROTATION TO PUT ON A SHOE
14B
EFFECT OF THE STEP ON THE FORWARD MOTION OF THE SHOE
15A
HOW MUCH TURN FOR HOW LONG
15B
WHAT AMOUNT OF INFLUENCE STAYS WITH THE SHOE INTO FLIGHT?
15C
. . . AND THE IMPORTANCE OF THE FOLLOW THROUGH
16
FACTOR OF WHERE SHOE IS GRIPPED
17
SHOE CAN WORK ITSELF OR TURN ITSELF
30D FINAL ADVICE WITH ONE'S CHOSEN FORM (added
on January 27, 2005)
33
OTHER PRINCIPLES TO BE DISCUSSED
CONCLUSION
READERS
RESPONSES AND COMMENTS
Email the website editor Kenny Wolf

Email address must be typed in to email me.
This email address is a jpeg image to avoid Internet spam email search
programs.
Curt
Day interview on how to pitch horseshoes
interviewed by his
son Paul Day
The Horseshoe Pitching
Career
and Tournament Results of Curt
Day
Frankfort, Indiana